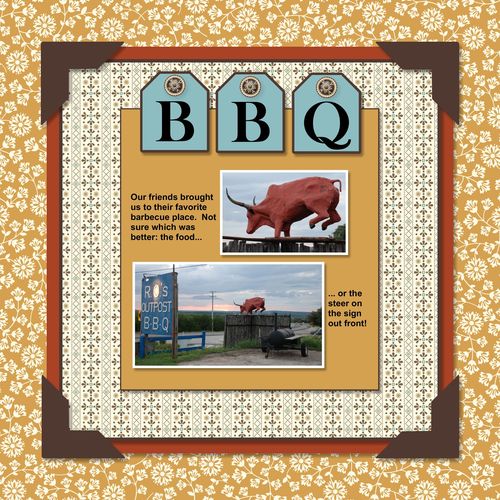
Here is a My Digital Studio scrapbook page that can be used for any kind of
outside, rustic or fun pictures! It uses several of the Spice Cake Designer
Series Papers that are available as a digital download.
SUPPLIES:
My Digital Studio software (118108)
Spice Cake designer series paper (125610)
Antique Brads pack (122164)
INSTRUCTIONS:
1. Open a new 8 x 8” page in My Digital Studio software. Open Punches and select the 1.25 square punch and click on apply. Enlarge the square to approximately 4.25 x 4.25”. Select color fill and choose More Mustard. Add mat, width 2 and color Early Espresso.
2. Add your pictures to the page, using a mat width of 4 in Whisper White. Size and crop as desired. Add Drop Shadow.
3. Open Punches, select the Tag punch, and click Apply. Color fill with Baja Breeze, add mat with width of 2 and color Early Espresso. Click on the tag to select it, then right click and select “Copy”. Click somewhere else to unselect the tag, then right click and select Paste twice. Position the tags across the top of the More Mustard square. Click on all three tags while holding down the CTRL button to select them all, then click on Align Objects at the top of the screen. Click Bottom to make the tags all line up. You can move an individual tag by unselecting them, clicking on the tag and using the arrow keys to move it left and right.
5. Add a text box, type the letter “B” in Baskerville Old Face font with font size 96. Position it on the first tag, then resize text box to fit. Copy the text box and paste it twice over the other tags, changing the final letter to “Q.”
6. Add brads on the tags by clicking on Embellishments, Antique Brads then select #4. Apply 3 times and move into position on tags. Add Drop Shadow.
7. Choose Text, add first text box, then type your journaling in the text box. This layout shows Arial font, font size 14 bold. Copy and position on other side of pictures and type your journaling.
8. Add another text box as in Step 1. It should be approximately 6.25 x 6.25” and filled with Spice Cake Designer Series Paper #2, mat width of 2 in Early Espresso. Note that since it was added “on top” of the previous items, it is the top layer and is covering them up! Select the punch, and click on “Change object layer” icon at the top. Select “Send to back” to move it behind all the items.
9. Repeat Step 9 to add another Punch approximately 6.75 x 6.75” filled with color Cajun Craze. Send to back.
10. Select Punches and add Large Photo Corner Punch, and change color to Early Espresso. Copy and paste 3 more, moving into position and rotating with the buttons in the Punches area to align with the corners. Add Drop Shadow to one of the punches, and select the option to add Drop Shadow to ALL the punches on the page.
11. Select Background Papers and change to Designer Series Paper, Spice Cake DSP #10.
12. Save your work, and either print on your home computer or submit to Stampin’ Up! professional printing service to guarantee that the colors are true!


