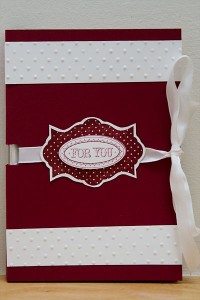
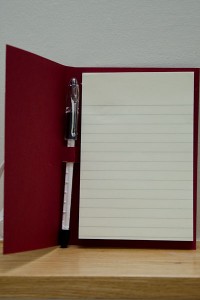
3-D Project of the Month: Notepad Holder (makes a great teacher gift!)
Here’s a quick and useful gift to make – great for an end of school year gift for the teacher!
SUPPLIES:
STAMPS: Layered Labels (127070 – wood; 127072 – clear)
INK: Cherry Cobbler (119669)
CARDSTOCK: 8.5″ x 11″ Cherry Cobber (119685), Whisper White
(100730)
ACCESSORIES: 3/8″ Whisper White Taffeta Ribbon (109070), Large Oval
Punch (119855), Paper Snips (103579), Stampin’ Trimmer (126889),Simply Scored Tool (122334), Stampin’ Dimensionals
(104430), SNAIL (104332), Big Shot (113439), Perfect Polka Dots Textured
Impressions Embossing Folder (117335)
OTHER: large self adhesive note pad (mine measured 4″ x 6″), clear barrel pen
INSTRUCTIONS:
1) Cut your Cherry Cobbler cardstock to 9.5″ x 6.5″
2) Place the cardstock in landscape orientation on your Simply Scored Tool (so that it’s more wide than tall)
3) Score at 4.5″ and 5″ to create the spine of the folder
4) Place your scored cardstock onto your cutting tool and cut two 1″ slits across the score lines in the middle of the cardstock (at approximately 3″ & 3.5″) to create the holder for the pen
5) Fold along score lines and push the slit inwards to create the pen holder (see photo)
6) Stamp the image twice onto Whisper White cardstock in Cherry Cobbler ink. Trim around one image, leaving a small border. Use the large oval punch to punch out the center of the other image, then use Stampin’ Dimensionals to adhere to the center of the cut out image
7) Cut a length of ribbon so that you can tie the folder closed.
Lay the ribbon onto the folder and adhere your image on top of the ribbon to
hold it in place
8) Run a 4.25″ x 5.5″ piece of Whisper White cardstock in the Perfect Polka Dots folder through the Big Shot
9) Cut two 1″ x 4.5″ pieces of cardstock and adhere to the folder front as per example
10) Cut a .5″ strip of the same embossed cardstock and roll into a tube. Open the pen and insert the strip into the pen barrel to create a coordinating pen.
11) Adhere the self adhesive pad to the inside of the folder, slide in the pen and tie the folder closed – you are done!


