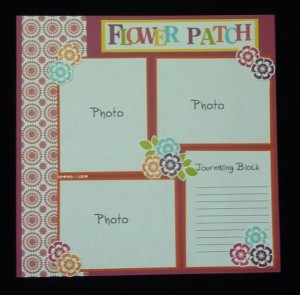
It can be scary to start scrapbooking… but it doesn’t have to be that way. If you just remember 3 basic elements, you can be scrapping in no time! The 3 elements are title, photo(s), and journaling. And if you want to add a 4th, try a little embellishing!
Here’s a simple page you can try. You can choose your colors from the photos themselves or take inspiration from some Designer Series Paper. For this 12×12 page, I chose the new Floral District paper, and the beautiful colors it contains.
This layout is done using mostly traditional paper methods, with the title done in My Digital Studio, but you could also do the same simple layout completely in digital format in My Digital Studio!
Supplies:
Stamps: Betsy’s Blossoms (wood: 126004, clear: 126006)
Paper: Rich Razzleberry 12×12 card stock (124292); Whisper White (100730), Tangerine Tango (111349), and Daffodil Delight (119683) card stock; Floral District Designer Series Paper (126919)
Ink: Baja Breeze (126960), Daffodil Delight (126944), Old Olive (126953), Rich Razzleberry (126950), Rose Red (126954), and Tangerine Tango (126946) Classic Stampin’ Pads
Digital: My Digital Studio (118108); your favorite digital alphabet (this sample was made with Noteworthy, but the Just Perfect Upper alphabet (124583) looks almost exactly the same
Instructions:
1. Cut a 3″ strip of designer paper and adhere to left side of 12×12 sheet of Rich Razzleberry card stock.
Mat photos on Tangerine Tango card stock and attach to page. In this sample, the mats are each 5-1/2″ x 4-1/4″ and the paper indicating photos are 1/4″ smaller, but you can make your photos any size that you like! Be sure to leave one block for journaling.
2. Add journaling using whatever method you are happy with; you can hand-write the story that goes with the photos, or you can use a computer. Feel free to draw guidelines if you want. Some people say that the journaling is the most important aspect or your scrapbooks so don’t skip this step!
3. Add a title. In this sample, My Digital Studio was used to create the title block. It used the Noteworthy alphabet, which was a hostess-only product, but if you don’t have that one, the Just Perfect alphabet would be almost exactly the same. And with the Just Perfect alphabet, you can get the upper case, lower case, and/or numbers! The colors were matched to the ink pads that were used for the flowers. Rather than struggle to make the title perfectly straight, make it imperfect! Trim to size and layer onto a piece of Daffodil Delight card stock.
4. Finish the page by stamping and cutting flowers with colors taken from the Designer Paper and attaching to your page.
It was easy, it was fun, and you can do it, too!


