Upcoming paper crafting classes for Winter 2012!

I am excited to share the schedule of upcoming paper crafting classes for
Winter 2012!

The first event is a free demonstration of My Digital Studio, the intuitive digital software from Stampin’ Up! for making cards, scrapbooks, slide shows and more!  I will have samples of items that have been made with the software, and will show a quick demonstration of how fast & easy it is to use on the big screen. No squinting!  Coffee! Wednesday, 1/18/12 from 1:00pm to 2:30pm.

Note – if you are interested in purchasing My Digital Studio, let me know and I can help you get it set up on your computer if you can bring your laptop to Ridgewood, or over the phone if you are far away!

Each month I will be running two different types of classes.  You must register and pay in advance so I can have materials ready for you!

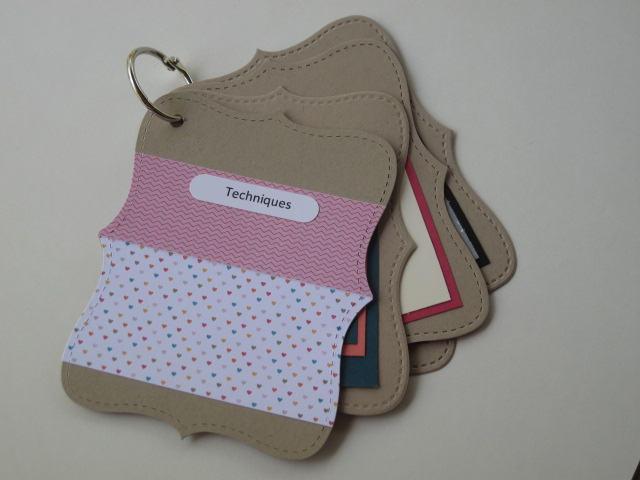
1)    Technique class – we will make two different cards and a third item, which may be a 3D item or another… interesting thing!  We will use at least two different techniques on the projects, and you will be able to make a little reference card with a sample of each technique and directions on the back.  Keep these technique cards on a ring and refer back to them when you are looking for some inspiration!  Dates: Thursday 1/19 at 11:00am (note changed time!), and Thursdays on 2/9 and 3/15 at 1:00pm. Fee $20.

Technique ring

Technique Ring

2)     Scrapbook class – we will alternate a hands-on, paper scrapbook layout class one month with a My Digital Studio scrapbook/technique class the next month.

  • For the hands-on layout class, I will give you everything you need to create a layout with blank spots for the pictures, and you can take it home and add your photos. Thursday 2/10 at 1pm. Fee $20.
  • For the MDS class, bring your laptop with My Digital Studio loaded on it.  I’ll have the big screen set up so everyone can see the demonstration, and then we can work through one or two cool techniques while creating a project.  Thursdays on 1/26 and 3/22 at 10am for beginners and 1pm for experienced users. Fee $20.

Classes are held at my home studio in Ridgewood.  Contact me for more details or to sign up!  And for those who are not in the local, northern NJ area… I
plan to add some online classes in the second half of the year!

I hope to see you at one of the upcoming paper crafting classes for
Winter 2012!

Free My Digital Studio download

Have you started using My Digital Studio, and would you like a free My Digital Studio download?  What a question!  Of course, who wouldn’t?!  Take a look:

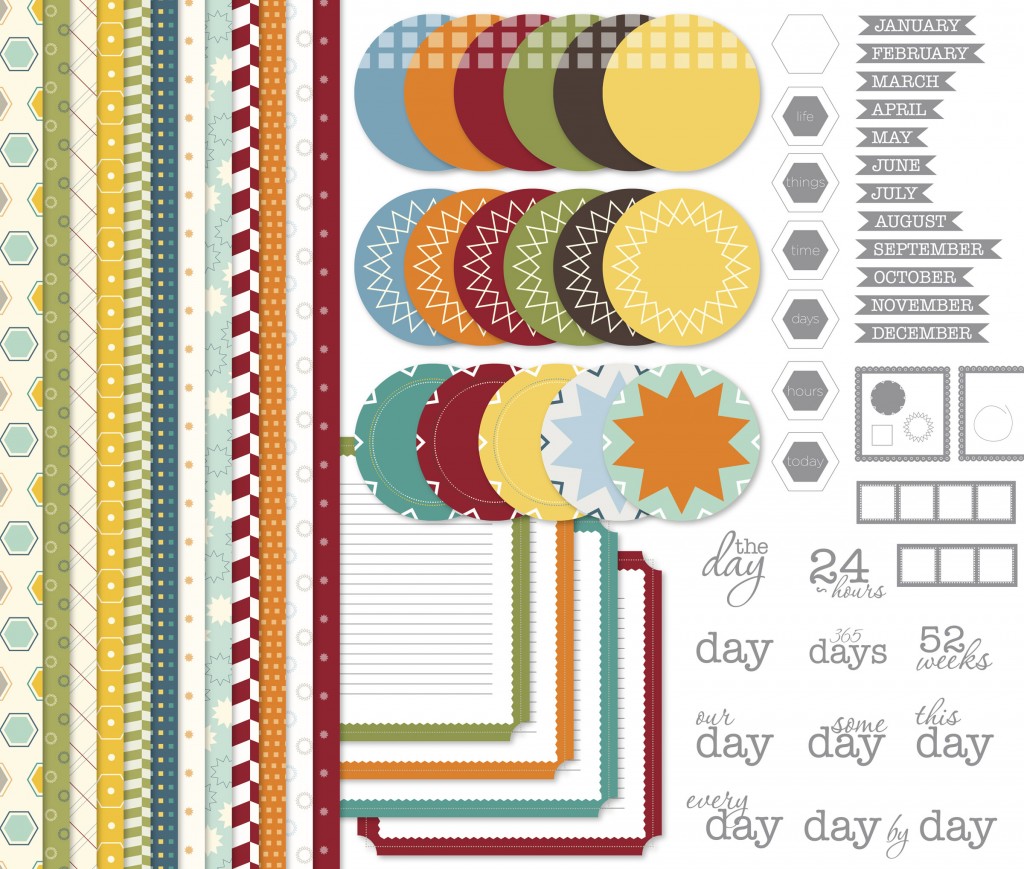
MDS Day in the Life Kit

MDS Day in the Life Kit

Stampin’ Up! is giving away a free download for anyone who has a Facebook page and “Likes” their Facebook page and fills out a survey, or you can also get the download by simply filling out the quick survey (see links below).  It will be available only until Jan. 10.  Here’s what Stampin’ Up! says:

Thank you for being our friends! To show our appreciation for our 100,000 (plus) Facebook fans, we’re giving away a free digital kit to EVERYONE to use with My Digital Studio (or any other design software if My Digital Studio is not available where you live). The Day in the Life kit contains Designer Series Papers, embellishments, a Designer Template, and is valued at $14.95(US)! … And so you (and your friends) have plenty of time to download the kit, we’ll make sure it is available through January 10.

Here’s what to do:

  • To become a Facebook fan, go to your facebook page, search for “My Digital Studio” to “Like” the page and start the survey.
  • To bypass Facebook and fill out the survey and get the download, click the following link:

Day in the Life Kit – FREE Download!  surveymonkey.com

When you download the kit, you simply select whether you have a PC or Mac, and whether you are using it within My Digital Studio or simply as graphic material in another graphic program.  It guides you through the steps – easy!  This is the same process you can use if you purchase downloads online.

Please contact me if you have any questions about My Digital Studio or downloads.  If you would like to see what other downloads are available, or more info about My Digital Studio, click here.

I hopy you enjoy your free My Digital Studio download!

Bargain Bin Blitz ends January 5

Don’t forget to thake advantage of the Stampin’ Up! year-end clearance sale before the Bargain Bin Blitz ends January 5!  There are many different items available at very marked down prices – some are as much as 80% off the original price.

Clearance Rack Blitz Dec 15-Jan 5

Clearance Rack Blitz Dec 15-Jan 5

Items are available until they run out! (which of course makes sense if you think about it).  Some items may still be in the Bargain Bin after the blitz is over, but don’t take a chance.

Check out the values by clicking on the “Shop Now” button on the top right.  This will take you to my online store, where you can open an account with Stampin’ Up!, place an order and have it delivered directly to your door.

What a great way to invest some of your holiday cash gifts – before the Bargain Bin Blitz ends January 5!

Holiday stocking decorations

While we are still in the leftover glow of the holidays, I would like to share these cute holiday stocking decorations with you!  There are six different combinations of cardstock and Frostwood Lodge DSP.

Holiday Stocking 1

Holiday Stocking 1


Holiday Stocking 2

Holiday Stocking 2


Holiday Stocking 3
Holiday Stocking 3


Aren’t they cute?


One of my fellow demonstrators used the Big Shot die cutting machine and the Holiday Stocking Bigz Die, and cut out a bunch of these out of different cardstock and Frostwood Lodge Designer Series Paper.  They gave them to me with a selection of the felt decorations from the Holiday Mini catalog.  I had fun putting them together!

Then, I couldn’t decide where to use them.  So at the last minute I clipped each pair together with a paper clip and held them up with one of those little place card holders!  I got a kick out of  them – it looked like my Holiday Stocking decorations were dancing in a circle!


Journaling about the New Year

This week’s Sunday Journal post covers journaling about the New Year!

Sunday JournalWhile many folks are uncomfortable about incorporating words or writing on a page, perhaps because they are not sure what to write, I find that words can be used to either embellish the story that the pictures tell, or to spark my creativity in coming up with a page that I want to create.

This is the time of year that causes many of us to spend a little time in reflection… we think about what has happened in the past year, or our lives in general… what the new year will bring… are we on track for what we planned for our lives?  what is coming up in the new year?  do we have any resolutions for the new year?

How can we use this info on a scrapbook page?  I’ll explore this topic every Sunday during this month!  The first idea I suggest for journaling about the New Year involves an examination of what happened LAST year!

Here is this week’s idea:  Try making a two-page spread that shows the highlights of the things that have happened during the past year.  You can organize it several ways, including things like:

  • major events (births, graduations, weddings, new tooth, new job, new home)
  • milestones reached (ran first 5K race)
  • your thoughts and feelings about some of the events
  • why these things are significant to you (I never thought I would live in such a lovely home!)

Your pictures or topic can be organized in different ways:

  • chronologically – for example, put them in order by month (but don’t feel like you need to show something for every month… unless you WANT to!)
  • by person in the family (great things for Janey, and Michael, etc.)
  • by topic (vacations, home life, friends, pets)

You can tell the story in a variety of ways:

  • use a lot of little pictures to remind you of the events
  • you can use a series of your words or musings about the events
  • you can use a simple format, without much other embellishment, as there will likely be so many pictures on the page
  • you can divide the pages into sections for each topic by using pretty ribbon or strips of cardstock, or different colors of cardstock for each section
  • don’t forget to put the year on the page!

If you like the results, consider doing a series of pages like this for other years and making a separate scrapbook out of them.  It can give you a great overview all in one place!  Because, if you think about how many scrapbooks you would (or will) have if you scrap all the pictures that you probably have, you could fill a whole bookshelf!  Having one book where you can see people grow and change, and see the major milestones and events of each year can give you a whole new perspective on things.

Amazing what you can come up with while journaling about the New Year!

Bargains at the Stampin’ Up! Clearance Rack Blitz!

Get your bargains at the Stampin’ Up! Clearance Rack Blitz!  It’s the end of the year and a great time to advantage of some fantastic savings!

Clearance Rack Blitz Dec 15-Jan 3

Clearance Rack Blitz Dec 15-Jan 5

Dates: December 15, 2011-January 5, 2012

Details:
Nearly 200 new Clearance Rack items are being added to the Online Store at discounts up to 80 percent off retail–while supplies last!

  • Online orders qualify for this promotion. Orders can include non-Clearance Rack items, as well.  Or contact me if you need help placing an order!
  • The Clearance Rack Blitz includes old-body style punches.
  • There is no minimum purchase required to participate in this promotion.
  • Qualifying Clearance Rack orders are eligible for hostess benefits/Stampin’ Rewards if your total purchase is $150 or more.
  • Following the Clearance Rack Blitz sales period, some blitz items may remain in the clearance rack; others may be removed and reappear at an undesignated time in the future.
  • Clearance Rack Blitz items are only available while supplies last. There are no refunds or exchanges on Clearance Rack items.
  • Click here to view Clearance Rack Blitz items in my Online Store.
  • Deadlines:
    • Phone: Thursday, January 5, 2012; 8:50 PM (EST)
    • Online Store: Thursday, January 5, 2012; 1:50 PM (EST)

SO… be sure to get your bargains at the Stampin’ Up! Clearance Rack Blitz!

Journaling on my scrapbook pages

I have a confession about the journaling on my scrapbook pages that I hinted on Wednesday that I was going to share… I don’t like my handwriting!

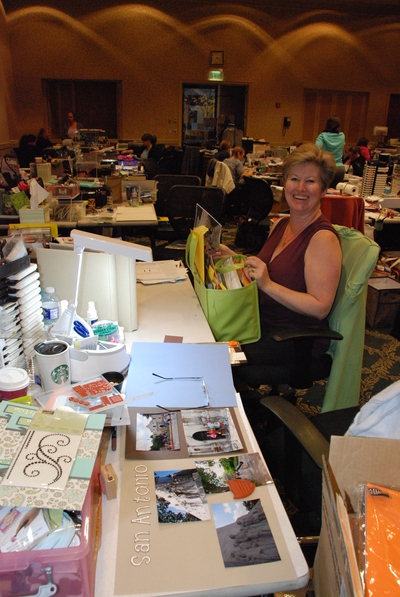
Here’s the picture from the last post that started this off… it shows my friend Pat, who sat next to me at the last NJ Crop Weekend.

My friend Pat at the Fall 2011 NJ Crop Weekend

My friend Pat at the Fall 2011 NJ Crop Weekend

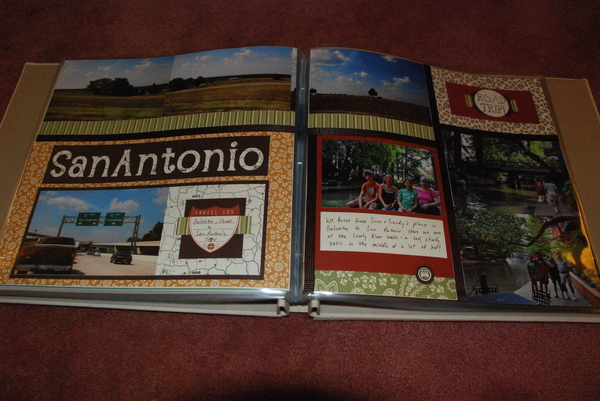
And do you see the scrapbook page about San Antonio that was in progress
at the foreground of the picture?  I was working on our Texas vacation pictures
that weekend.  Here’s how the following set of the finished pages turned out:

San Antonio pages

San Antonio pages

I used a variety of the Spice Cake Designer Series Paper, since the  colors really seemed to match the subject – and of course they are all color coordinated with each other and with the Stampin’ Up! cardstock and ink colors, making life really easy for me to piece together this quilt style scrapping!  I added strips of the 3/8″ Quilted Satin Ribbon to separate the rectangles on the page.  I love how it came out!

But here’s the confession that I want to point out about pages – notice the journaling that I hand wrote on the bottom right.  I have to tell you that I really, really do not like my own handwriting.  This is not an issue when I do a lot of my scrapbooking in My Digital Studio and just type my journaling messages.  But, when I do paper scrapping, I make myself hand write it – for many reasons:

  1. I find that I can wind up spending TOO much time on a set of pages
    if I get too crazy making the journaling look perfect.  I get involved with creating a document to type the journaling, then worry about the size and shape it will wind up to be, the font size, alignment and so on…
  2. Focusing on the appearance of the journaling makes me lose track of what I am actually saying – kind of a form over function thing, I guess!
  3. I also think it is really important to make the pages more “organic” and accessible by including the personal touch of my own handwriting.
  4. Our writing changes over time, and years from now it will be great to look back on these pages and see what it looked like now!

Now don’t get me wrong – there are some times when I am doing a hand made page, and I will go to My Digital Studio and print out a title in the correct matching color for the page… but I no longer go out of my way to omit my handwriting from journaling on my scrapbook pages!


NJ Crop Weekend coming up in February!

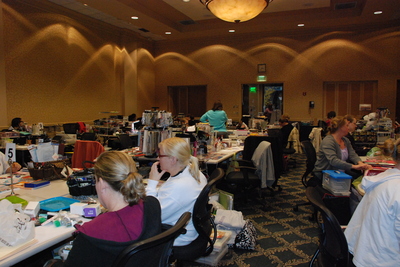
I am so excited because there is already another NJ Crop Weekend coming up in February!  That’s when I get together with a bunch of creative and interesting people, and we head out to the beautiful Dolce Hotel & Convention Center in Basking Ridge, NJ to work on our favorite paper crafts.  Everyone gets a large, dedicated work space to spread out and do their projects.  Here are some pictures of the latest Fall Crop Weekend!

Crop room at the Fall 2011 NJ Crop Weekend

Crop room at the Fall 2011 NJ Crop Weekend

Folks had lots of room to get their stuff done. Some people do scrapbooking, others make greeting cards… and some make use of the dedicated time, with none of the usual interruptions that we have at home, to do really unique things!  Check out this picture of my friend, Pat and look at the big tote bag she is holding in her lap.

My friend Pat at the Fall 2011 NJ Crop Weekend

My friend Pat at the Fall 2011 NJ Crop Weekend

Do you know all those papers and treasures that the kids bring home from school?  Well, Pat has been saving them in a bunch of bags, boxes & totes.  She brought EVERYTHING to the crop weekend, and happily sat there going through it all.  Some stuff was not very special, or was a duplicate, but she took all the stuff she wanted to save and put it into a Stampin’ Up! album for each of her children.  The pocket style of the album allowed her to tuck the various papers into the top of each page, and the kids can pull them out if they want to see them up close!  In one day, she reduced the stuff in a bunch of those totes into a nice thick album for each kid.  Woo Hoo for organization!

[Hint: do you see the scrapbook pages about San Antonio that are in progress in the foreground?  I’ll share how they came out in an upcoming post!]

Now that you see what the NJ Crop Weekends look like in the crop room, I hope you will consider joining us for the Winter 2012 Crop Weekend on February 24-26, 2012.  Click here for more info, or contact me at carol@carolGpapercrafts.com!

Treat box at the banquet!

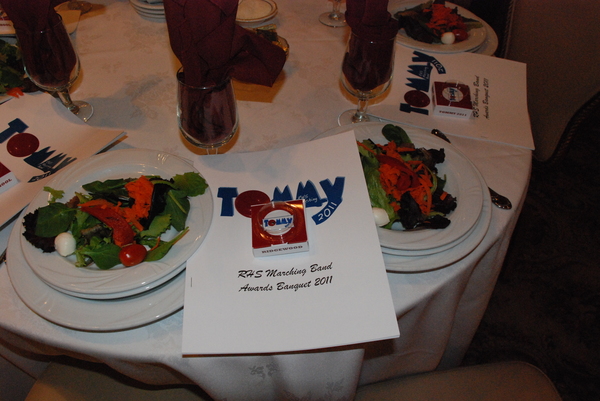
Here is a picture of how we shared the treat box at the banquet!  I made these cute little favor boxes, or treat boxes, using My Digital Studio to print the paper and the Bitty Box die cut on the Big Shot to cut them out.  The top is made from the Sweet Treat Cups with a little silver cake decoration ball inside as a pinball… it rolls around!  See details here.

We put one at each students’ place at the band banquet.  The band members thought they were cute, and enjoyed the candy inside… but I also think that they gave everyone something to play with during the long evening!

Tommy Pinball Wizard box at the banquet

Tommy Pinball Wizard box at the banquet

My Digital Studio treat box directions

Hey, yesterday I posted pictures of the cool little gifts I made for the marching band banquet, and I promised to share the My Digital Studio treat box directions!  So here we go. 

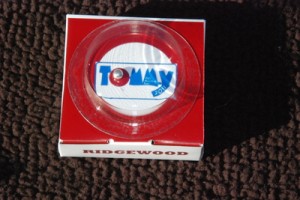
The music for this year’s show was Tommy by The Who.  So, as I posted yesterday, I used the Stampin’ Up! Sweet Treat Cups and added one of those little silver cake decorating balls as a pinball.  You can roll the ball around and try to get it into the hole that I punched in the letter “O” of the word “Tommy.”

Pinball Wizard treat box - score!

Pinball Wizard treat box - score!

Of course, it is fun to make little gifts or favors like this, and it only takes a couple minutes to assemble one… but when you make 100 of anything, those minutes can add up and it can take a while!  So, I used my brain and some of my favorite paper crafting tools to make it go faster… and make the results look really professional!  Read on!

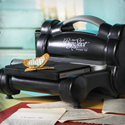
Big Shot die cut and embossing tool

While you can of course just cut out the shape for a box from some cardstock, score the sides and fold into a box, using the Big Shot and the Bitty Box die make quick work of it.  Feed the paper and die in, roll the handle and the die cuts the shape AND scores the fold lines in one easy step!  Then it is easy to fold along the score lines and assemble the box.

 
Frequently, I might embellish the finished box with ribbon or brads or stamping, but in this case I wanted to print rather small words on each side of the box.  I thought that it would be ideal if I could just print them out before I die cut the box shape.  So I immediately went to My Digital Studio, the intuitive software program by Stampin’ Up! that provides so many ways to do creative paper crafting for scrapbooking, card-making… and so much more, as you will see!  Click here to read on and see how I easily laid out the project!